


Introduction
Navigating through a website seamlessly is crucial for providing a smooth user experience. In WordPress, one of the most popular content management systems, creating and customizing navigation menus is a fundamental aspect of designing a user-friendly website. Whether you're a seasoned WordPress user or just starting out, mastering the art of crafting intuitive navigation menus can greatly enhance your site's usability and aesthetic appeal. Whether you're looking to create a simple menu for a personal blog or a complex navigation system for an e-commerce store, this guide will cover everything you need to know to get started. So let's dive in and learn how to create a menu in WordPress to enhance your website's user experience and functionality.
What is a Navigation Menu?
A navigation menu is a fundamental component of a website that serves as a roadmap for users to navigate through its various pages, sections, and content. Typically located at the top or side of a webpage, a navigation menu presents a list of clickable links or buttons that direct users to different parts of the site, such as home, about, services, blog, contact, etc. It acts as a user interface element, facilitating easy access to key information and enabling visitors to find what they're looking for quickly and efficiently. Essentially, a navigation menu organizes the website's structure and content, allowing users to seamlessly move between pages and explore different sections of the site with ease.
If you are building your ecommerce website, then just go through our previous blog build free ecommerce website and get a detailed step-by-step guide. Now let's get started with the guide on how to create a menu in WordPress.
How to Create a Custom Navigation Menu?
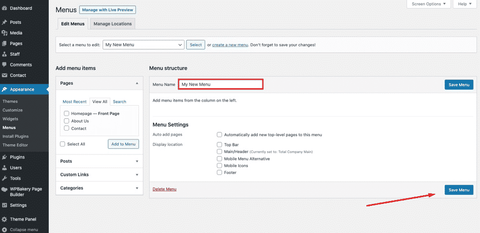
- Navigate to the "Appearance" section and select "Menus" from the dropdown menu. This action will direct you to the Menu Editor interface.
- Upon reaching the Menu Editor, designate a name for your menu in the provided field. Choose a title that reflects the purpose or location of the menu, such as "Main Navigation" or "Footer Menu."
- Once you've christened your menu, affirm its creation by clicking the "Create Menu" button. This action initializes the creation process, setting the stage for your navigation masterpiece.

- With your menu canvas prepared, it's time to populate it with content. Select the desired items you wish to include in your navigation from the available options on the left-hand side. These items can range from pages, posts, custom links, categories, or tags.
- After choosing the desired menu items, click the "Add to Menu" button. This action transfers the selected items to your menu canvas, where they await further arrangement and customization.
- Take control of your menu's structure by arranging the menu items to your preference. Utilize the drag-and-drop functionality within the Menu Editor interface to reorder the items as desired. This step allows you to prioritize content and optimize the user journey through your website.

- Depending on your website's design and functionality requirements, you may choose to configure additional menu settings. Explore options such as assigning a menu location, enabling dropdown menus, or adding CSS classes for custom styling.
- Once satisfied with the composition and configuration of your custom navigation menu, don't forget to save your changes. Click the "Save Menu" button to preserve your creation and make it live on your website. So this is all about how to create a menu in WordPress.
Creating Drop-Down Menus in WordPress?

- Navigate to the "Appearance" section. From the dropdown menu, select "Menus" to access the Menu Editor interface.
- If you're editing an existing menu, select it from the dropdown list under the "Select a menu to edit" section. Alternatively, if you're creating a new menu, enter a name for it in the provided field and click the "Create Menu" button.
- Begin by adding parent menu items to your navigation menu. These are the main items that will appear in the top-level menu. Select the pages or custom links you want to include from the options available on the left-hand side, then click the "Add to Menu" button for each item.
- To create dropdown menus, you'll need to designate certain menu items as subitems beneath a parent menu item. To do this, drag and drop the desired menu item slightly to the right underneath its parent item. You'll notice it indents slightly, indicating it's now a submenu item.
- Arrange your menu items and submenus to your desired hierarchy and order using the drag-and-drop functionality within the Menu Editor interface. This step allows you to structure your navigation menu logically and intuitively.
- Once you've organized your menu items and submenus to your satisfaction, be sure to save your changes. Click the "Save Menu" button to preserve your dropdown menu configuration.
- Before making your dropdown menu live on your website, take a moment to preview it. Use the "Preview" button at the top of the Menu Editor interface to see how your dropdown menu will appear to visitors.
- Depending on your professional WordPress theme, you may need to assign your dropdown menu to a specific location within your site's layout. Navigate to the "Manage Locations" tab within the Menu Editor interface to assign your menu to the appropriate location, such as the primary navigation menu or a sidebar menu.
Adding Categories to WordPress Menus?

- Navigate to the "Appearance" section and select "Menus" from the dropdown menu. This will take you to the Menu Editor interface.
- If you're working with an existing menu, choose it from the dropdown list under the "Select a menu to edit" section. Alternatively, if you want to create a new menu, enter a name for it in the provided field and click the "Create Menu" button.
- In the Menu Editor interface, look for the "Categories" section among the available options on the left-hand side. Click on it to expand the category options.
- After expanding the Categories section, you'll see a list of your website's categories. Check the boxes next to the categories you want to add to your menu. You can select one or multiple categories based on your menu's design and content organization.
- Once you've selected the categories you want to include, click the "Add to Menu" button. This action adds the chosen categories to your menu canvas, where they will appear as menu items.
- Arrange the category items within your menu to your desired order and hierarchy using the drag-and-drop functionality within the Menu Editor interface. You can position them alongside other menu items or nest them as subitems beneath parent menu items.
- By default, category menu items will display the category names. However, you can customize the label for each category menu item by clicking on the downward arrow next to the category name and entering a custom label in the "Navigation Label" field.
- Once you're satisfied with the arrangement and customization of your category menu items, don't forget to save your changes. Click the "Save Menu" button to preserve your menu configuration.
- Before making your menu live on your website, preview it to ensure everything looks as intended. You can use the "Preview" button at the top of the Menu Editor interface to see how your category menu will appear to visitors. Let's know more about how to create a menu in WordPress using custom links.
Adding Custom Links to Your WordPress Navigation Menus?

- Navigate to the "Appearance" section and select "Menus" from the dropdown menu. This will take you to the Menu Editor interface.
- If you're working with an existing menu, choose it from the dropdown list under the "Select a menu to edit" section. Alternatively, if you want to create a new menu, enter a name for it in the provided field and click the "Create Menu" button.
- In the Menu Editor interface, look for the "Custom Links" section among the available options on the left-hand side. Click on it to expand the custom link options.
- After expanding the Custom Links section, you'll see two fields: "URL" and "Link Text." In the "URL" field, enter the full web address (URL) of the custom link destination. In the "Link Text" field, enter the text you want to display for the custom link in your menu.
- Once you've entered the URL and link text for your custom link, click the "Add to Menu" button. This action adds the custom link to your menu canvas, where it will appear as a menu item.
- Arrange the custom link item within your menu to your desired order and hierarchy using the drag-and-drop functionality within the Menu Editor interface. You can position it alongside other menu items or nest it as a subitem beneath a parent menu item.
- If you want to customize the label for your custom link menu item, click on the downward arrow next to the menu item and enter a custom label in the "Navigation Label" field.
- Once you're satisfied with the arrangement and customization of your custom link menu item, don't forget to save your changes. Click the "Save Menu" button to preserve your menu configuration.
- Before making your menu live on your website, preview it to ensure everything looks as intended. You can use the "Preview" button at the top of the Menu Editor interface to see how your custom link menu item will appear to visitors.
How to Edit or Remove a Menu Item in WordPress Navigation Menus?
Editing a Menu Item:

- Log in to your WordPress admin dashboard and navigate to the "Appearance" section. Select "Menus" from the dropdown menu to access the Menu Editor interface.
- In the Menu Editor interface, identify the menu item you wish to edit. Menu items are listed vertically, with parent items displayed at the top level and subitems (if any) indented beneath their parent.
- To edit the menu item, hover your cursor over it. You should see an option to edit the item. Click on it to reveal the editing options.
- Depending on the editing options provided, you can modify various aspects of the menu item, such as its label, URL, or navigation properties. Update the desired fields to reflect the changes you want to make.
- Once you've made the necessary edits to the menu item, be sure to save your changes. This usually involves clicking a "Save" or "Update" button located within the Menu Editor interface.
Removing a Menu Item:

- Follow the same steps as outlined above to access the Menu Editor interface within the WordPress admin dashboard.
- Identify the menu item you wish to remove from the navigation menu.
- To remove the menu item, hover your cursor over it to reveal the removal options. Depending on the WordPress version and theme you're using, you may see an option like "Remove" or a delete icon (such as a trash can or X symbol) next to the menu item. Click on this option to delete the menu item.
- In some cases, WordPress may prompt you to confirm your action before permanently deleting the menu item. Confirm the removal if prompted.
- After removing the menu item, remember to save your changes to update the navigation menu. Click the "Save Menu" or "Update" button within the Menu Editor interface to preserve your modifications.
By following these steps, you can efficiently edit or remove menu items in WordPress navigation menus, ensuring your website's navigation remains organized and user-friendly. This is how to create a menu in WordPress and edit or remove them.
How to Add WordPress Menus in Sidebars and Footers?
Adding WordPress menus to sidebars and footers can enhance navigation. Also, it provide visitors with easy access to important links and content. Here are the steps to add menus to sidebars and footers:
Adding Menus to Sidebars:

- Start by logging in to your WordPress admin dashboard. Navigate to the "Appearance" section and select "Widgets" from the dropdown menu.
- In the Widgets interface, you'll see a list of available widget areas, including sidebars. These are typically labeled as "Sidebar," "Primary Sidebar," "Secondary Sidebar," etc., depending on your theme.
- Scroll through the list of available widgets until you find the "Custom Menu" widget. Alternatively, you can use the search bar to quickly locate the widget. Once found, drag and drop the Custom Menu widget into the desired sidebar widget area.
- In the Custom Menu widget settings, you'll see a dropdown menu labeled "Select Menu." Click on the dropdown menu to select the menu you want to display in the sidebar. If you haven't created a menu yet, you can do so by clicking the "Create a new menu" link.
- Depending on your theme and widget settings, you may have options to customize the appearance and behavior of the menu widget. Such as choosing a title for the widget or configuring additional settings. Make any desired adjustments to the widget settings.
- Once you've selected the menu and customized the widget settings to your liking, click the "Save" or "Save Changes" button to apply the changes. The menu should now appear in the designated sidebar on your website.
Adding Menus to Footers:

- Follow the same steps as outlined above to access the Widgets section within the WordPress admin dashboard.
- In the Widgets interface, look for widget areas specifically designated for footers. These are often labeled as "Footer Widget Area," "Footer 1," "Footer 2," etc., depending on your theme.
- Drag and drop the Custom Menu widget into the desired footer widget area. This action will add the widget to the footer section of your website.
- Just like in the sidebar, select the menu you want to display in the footer from the dropdown menu labeled "Select Menu" within the Custom Menu widget settings.
- Customize the widget settings as needed, such as providing a title for the widget or configuring additional options available in your theme.
- Save your changes by clicking the "Save" or "Save Changes" button. The menu should now be visible in the designated footer widget area on your website.
Conclusion
In wrapping up, mastering the art of how to create a menu in WordPress website brings immense value to your online presence. Through this guide, we've demystified the process, making it accessible and straightforward for users of all levels. However, beyond just simplicity, our WordPress bundle offers an added layer of convenience and efficiency. With themes tailored to prioritize user experience and ease of customization. You not only have the tools to create stunning menus but also the power to effortlessly update and refine them as your site evolves. By harnessing the capabilities of our bundled themes, you're not just creating menus. You're sculpting seamless navigation experiences that leave a lasting impression on your visitors. So, dive in with confidence, knowing that with our bundle, you're equipped to craft menus that not only guide but also delight your audience every step of the way.
